

Discovering the Frosty Wonders of Dry Ice 🧊
Welcome to the frosty, foggy, and utterly fascinating world of dry ice. Have you ever wondered about those clouds of smoke billowing from a witch's cauldron in a spooky movie? That's the power of dry ice at play! But what exactly is this mysterious substance, and what are its common uses?
Essentially, dry ice is the solid form of carbon dioxide (CO2), a gas we exhale every time we breathe. It's called 'dry' because it skips the liquid phase and sublimates directly into gas, a process that's as intriguing as it sounds. In the everyday world, you'll find dry ice making its magic in everything from preserving food in coolers to creating smoke effects in theatres and concerts.
So, is dry ice dangerous? The answer, dear reader, is yes and no. Dry ice is safe when handled correctly, but can cause harm if mishandled. But don't worry, we'll guide you on how to handle dry ice safely, store it correctly, and even conduct some innovative science experiments. So, are you ready to unmask the power of dry ice?
Staying Cool: Essential Safety Tips for Dry Ice Handling
As we delve into the icy realm of dry ice experiments, we must never forget the cardinal rule: safety first. Is dry ice dangerous, you ask? Well, it's not exactly a cuddly kitten. With a temperature of -78.5 degrees Celsius, it can cause frostbite or burns upon contact with skin. So, how to handle dry ice? Like a precious artifact in a museum, with lots of care and the right tools.
Picture yourself as a scientist, armed with insulated gloves and safety goggles, ready to unveil the power of dry ice. But remember, this isn't just about donning the right gear. Knowing how to store dry ice is equally crucial. It sublimates, meaning it turns directly from a solid to a gas. Therefore, it should be stored in an insulated container, but never in a completely sealed one, to avoid pressure build-up and potential explosion.
So, are you ready to dive into the world of innovative science experiments with dry ice, armed with knowledge and safety precautions? Let's embark on this chilly adventure, but remember, safety isn't just a suggestion—it's a requirement.
Before we dive into the exciting world of dry ice experiments, it's crucial to ensure you're fully equipped with the necessary safety gear. Here's a handy checklist to help you prepare:
Now that you're equipped with the necessary safety gear, let's move on to the fascinating experiments you can perform with dry ice.
Ignite Your Curiosity: Exciting Dry Ice Experiments Unveiled
Experiment 1: Can You Create a Bubble with Dry Ice? 🧪
Now that we've understood the properties and safety precautions for handling dry ice, let's dive into our first experiment. Here's a detailed guide on how to create a dry ice bubble:
Creating a Dry Ice Bubble: A Step-by-Step Guide


Learn more about 🔬 Creating a Dry Ice Bubble: A Step-by-Step Guide or discover other Dry Icy guides.
Congratulations! You've successfully created a dry ice bubble. This experiment not only demonstrates the fascinating properties of dry ice but also makes for a great visual spectacle. Next, let's take a look at the resulting bubble from our experiment.

Now that we've seen the result of the dry ice bubble experiment, let's watch a video to understand the process better.
That was an interesting demonstration of the dry ice bubble experiment, wasn't it? Now, let's proceed to our next experiment - creating comets at home using dry ice.
Experiment 2: Crafting Mini Comets in Your Kitchen 🌠
Now that we've covered the basics of dry ice and its safety precautions, let's dive into the fun part - the experiment! Here's a simple guide on how you can create a miniature comet right in your kitchen.
Crafting Mini Comets with Dry Ice: A Step-by-Step Guide


Learn more about Crafting Mini Comets with Dry Ice: A Step-by-Step Guide or discover other Dry Icy guides.
Congratulations! You've just created a mini comet using dry ice. Remember to handle your comet with care and always prioritize safety when conducting experiments with dry ice. Stay tuned for our next experiment!

Now that we have seen how a dry ice comet looks like, let's watch a video demonstration. This will give you a clearer idea of what to expect when you perform the experiment yourself.
Isn't it fascinating how a miniature comet can be created using dry ice? With careful handling and correct procedures, you too can recreate this experiment. Now, let's move on to our next experiment where we create smoke rings using dry ice.
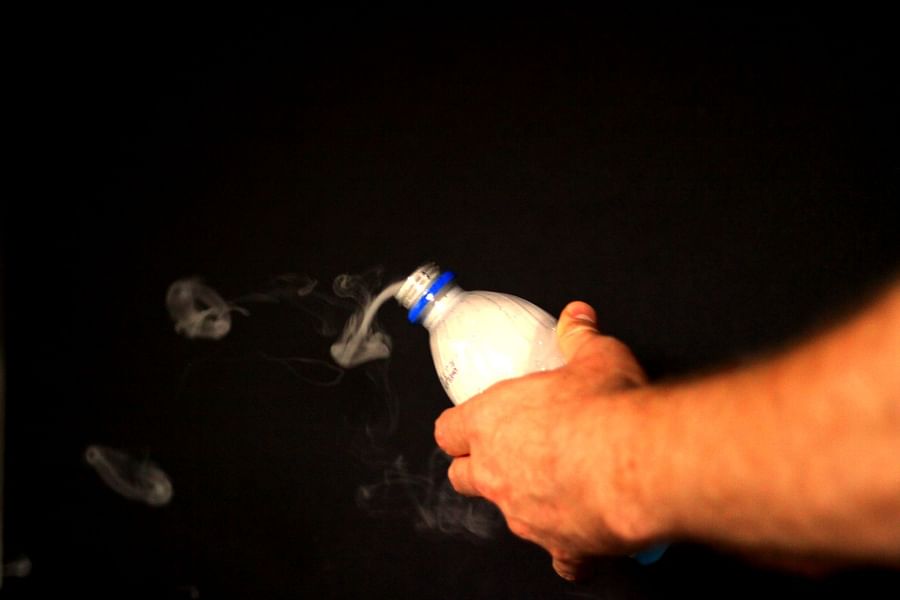
Experiment 3: Conjuring Smoke Rings with Dry Ice Magic 💨
Now that we've explored the science behind dry ice, let's dive into our third experiment. This guide will walk you through the process of creating mystical smoke rings using dry ice. As always, safety is paramount, so ensure you follow the precautions mentioned at each step.
Creating Smoke Rings with Dry Ice: A Step-by-Step Guide


Learn more about 🌬️ Creating Smoke Rings with Dry Ice: A Step-by-Step Guide 🧪 or discover other Dry Icy guides.
And voila! You have successfully created smoke rings using dry ice. This experiment is not only fun but also a great way to understand the properties of dry ice and its interaction with the environment. Up next, we have an image of the smoke rings created during this experiment.
Now that we've seen the results of the dry ice smoke rings experiment, let's take a look at a video demonstration. This video by SpanglerScienceTV not only shows the experiment in action, but also provides valuable tips on where to buy and how to handle dry ice safely.
Having seen how amazing dry ice can be in these simple experiments, let's delve into some more advanced experiments that science enthusiasts can try. Remember, safety first!
For the Science Whizzes: Advanced Dry Ice Experiments
Now that you've mastered the basics, are you ready to delve deeper into the chilly world of dry ice? You've seen the power of dry ice in action, but what if I told you there's more to explore? Yes, indeed! We're about to embark on a journey into the realm of advanced dry ice experiments. These are not for the faint of heart, but for the true science enthusiasts with an insatiable thirst for knowledge.
Is dry ice dangerous? Absolutely, if not handled with care. But don't let that deter you. With the right safety precautions, you can harness the full power of dry ice for some truly innovative science experiments. Remember, safety is paramount. Gloves, goggles, and a keen understanding of dry ice safety precautions are your ticket to this frosty adventure.
Ready to explore the unknown? To push the boundaries of what you thought possible with a simple block of frozen carbon dioxide? Then buckle up, fellow science enthusiasts. We're about to dive into the coolest part of our journey: the advanced experiments with dry ice!
Unmasking the Power of Dry Ice: Test Your Knowledge
Let's see how well you understood the article and the fascinating properties of dry ice. Are you ready?
Learn more about 🧪 Test Your Knowledge: Unmasking the Power of Dry Ice 🧊 or discover other Dry Icy quizzes.
Parting Thoughts: Reflecting on the Frosty Magic of Dry Ice
And there you have it, fellow explorers of the icy unknown - a whirlwind journey into the heart of the amazing power of dry ice. We've blown bubbles that shamed the mightiest soap, crafted comets in our kitchens, and painted the air with smoke rings that would make a dragon jealous. But remember, while dry ice gushes with potential for innovative science experiments, it's not all fun and games.
Is dry ice dangerous? In a word - yes. When not handled with respect and the proper safety precautions, dry ice can indeed be harmful. That's why we've emphasized on how to handle dry ice and how to store dry ice throughout our frosty adventure. Because, science without safety is like a comet without a tail - it just isn't right!
So, what's next? Will you dive deeper into the power of dry ice, or perhaps branch out to explore other scientific wonders? Whatever your choice, let's take our newfound knowledge and let it guide us - responsibly - to new horizons. After all, the world is but a laboratory to our inquiring minds!
Before we part, let's hear from you. Which of these experiments sparked your curiosity the most? Catch our community poll and cast your vote. Until next time, keep exploring, keep experimenting, but above all, stay safe!
Which dry ice experiment are you most excited to try?
We've covered some fascinating experiments with dry ice in this article. Now, we want to know: which one are you most excited to try out? Cast your vote and let's see which experiment is the community favorite!


No comments yet. Be the first to share your thoughts!